


THE SQUAT:
A FOUNDATIONAL PROGRESSION
by Morgan Noble

After training a wide variety of individuals, all with different strengths and weaknesses, below I have outlined a step-by-step approach to ensure good squat mechanics, reducing injury risk, and providing a solid foundation for mastering the squat safely and effectively. Whether you're new to fitness or refining your technique, this progression helps you to move better and feel stronger.

INTRODUCTION
WHAT IS A SQUAT?
A Squat is vertical translation of the pelvis, as well as a Hip to Knee ratio game. What I mean is, our pelvis should be primarily be moving up and down. Whilst also figuring out how much knee we need to use, and how much hip we need to use, in order to complete the task.
This ratio can vary from person to person.
Some people use too much knee, and not enough hip.
Some people use too much hip, and not enough knee.
And this is exactly what this progression has been designed to do.
Seen as a lot of peoples (but not everyones) issue is that they are too forward in space, we begin with variations that help us shift our weight back, and develop an understanding as to how to move our pelvis up and down. Beginning with variations that are relatively biomechanically simple, and slowly introducing more and more components as we go, being cautious to not introduce too much too soon.
Ideally, we would want to get really good at one variation in order to qualify for the next. This isn't a game of how far up the tree can I go without falling off. It's a game of progressing level by level.
LEVEL ONE
TRX / HIGH ANCHOR SQUAT
A lot of people who struggle with the Squat share a common theme -
an inability to identify where their weight is in their feet.
The TRX Squat (High Anchor Squat) can be a nice way to introduce someone to a Squat pattern, whilst giving them the environment to experiment with not only depth, but also foot pressure. At the start of the movement our knees are positioned behind our ankles (negative shin angle) which would place more pressure on the heels compared to the forefoot. This doesn't mean however, we lose the toes entirely. Then as we descend into the squat we allow our knees to travel forward, whilst maintaining an upright torso, and whole foot pressure (not only the toes, not only the heels, the whole foot)
In order for our knees to travel forward, our tibia needs to IR and the foot needs to be able to pronate. Meaning, that if someone runs into issues with greater amounts of forward knee travel (dorsiflexion) or if someone is being limited in their squat by foot mechanics, we can modify how much forward knee travel they're exposed to by repositioning them. If we were to stand closer to the TRX straps, we would need to lean back more (giving them more run way) reducing how much of a role foot mechanics plays within the equation.
COACHING CUES:
-
Long Arms (Seperated shoulder blades)
-
Lean back against the straps
-
Long Spine & Abs Tight
-
Whole Foot Pressure
-
Go down into your Squat
-
Push more back than up (Diagonal Force Vector)

LEVEL TWO
FOAM ROLLER HACK SQUAT
or The Hack Squat Machine (optional)
The Hack Squat is one of my favourite exercises, and a great variation to work on improving Squat function, and strength. It allows us to position our feet slightly in-front of us which can can create a slight negative shin angle, similar to before. We also have the opportunity to experiment with foot pressure too, as well as depth and forward knee travel (as we descend into the squat) similar to the TRX Squat we previously mentioned. We are also given the opportunity to learn how to position our rib cage and pelvis more effectively due to the external cue of the back pad. This is also more loadable than the previous variation. Obviously this is all context dependant as not everybody will have access, or fit, on a Hack Squat. Therefore, I have also included the Foam Roller Hack Squat as well.
The Foam Roller Hack Squat ticks similar boxes to the original Hack Squat Machine. The only differences are, that it's less loadable (which may make it a good variation to implement before the Hack Squat Machine), but we no longer have a stable machine to work with, nor do we have a back pad to assist in our learning of rib cage and pelvis alignment. Therefore, we will have to create our own level of stability, and position our rib cage and pelvis ourselves (which isn't a bad thing. It's just something to note).
Both variations (when set up appropriately) can give us the opportunity to use a "low reach". This low reach component can assist in rib cage positioning. If someone is used to excessively arching their back, and lifting their rib cage, we can implement a reach to assist in the positioning of the rib cage. Arms up, rib cage can follow. Arms down, rib cage can follow. This can help better aligning it with the pelvis. However, a conversation around rib cage and pelvic positioning also needs to be had. Why are we adding a low reach? What are we trying to learn by using it? Is this something we always need to do? No.
COACHING CUES:
-
Long Arms (Seperated shoulder blades)
-
Long Spine & Abs Tight
-
Maintain Whole Foot Pressure
-
Go down into your Squat
-
Keep the Pelvis under the Rib Cage


LEVEL THREE
COUNTER BALANCE SQUAT
(TO BOX < NO BOX & with possible heel elevation)
The Counter Balance Squat is up next as it allows us to begin the movement with a more neutral - slight positive shin angle, but also exposes individuals to a more "free weight" squat variation. This is also a good tool for people who may lean forward a too much. As the weight is in-front us now, we can no longer lean forward, we have to shift back.
Some individuals can also benefit from putting a box or bench behind them. This environmental change can help signal a small amount of backward hip movement whilst remaining upright (hip to knee ratio). It is important though to have a conversation around why the box is there and why we're using it. What does "backward hip movement" mean? Is it a small hinge? or an anterior pelvic tilt? (sticking the bum out) We want the former, not the latter. Our goal is to show them how much hip they need to use to perform the task, not teach them how to RDL. The box can also (when coached correctly) create an environment for people to better understand that middle portion of the Squat where IR demand goes up. I tell my clients to not go looking for the box, but rather to perform a squat and then be pleasantly surprised that there's one there. Our goal is to not swing ourselves off of the box. Slowly push on that gas pedal to stand up. Illustrating a better control of that IR territory compared to swinging tactic to bypass it. We can begin with the box at a height that allows someone to complete a good quality squat, then slowly lower the box over time, eventually graduating to no box at all once they have gained greater levels of positional awareness and control.
We can also use the "low reach" component we mentioned before. And some people may also benefit from heel elevation too. Bear in mind, this will also push them forward (which can help teach them to shift themselves back), and can sometimes allow for greater ranges of movement when performed correctly.
COACHING CUES:
-
Long / Medium Long Arms (not close)
-
Long Spine & Abs Tight
-
Maintain Whole Foot Pressure
-
Go down into your Squat
-
Push straight up (not forward)


LEVEL FOUR
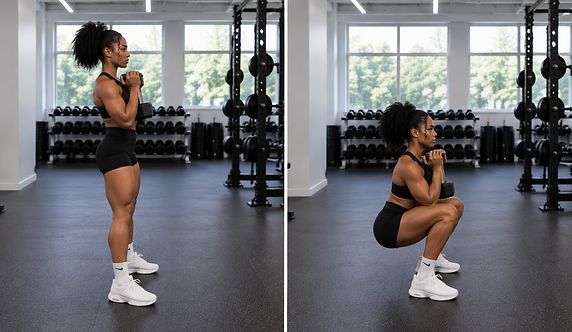
GOBLET SQUAT
(TO BOX < NO BOX & with possible heel elevation)
The Goblet Squat now brings the weight we are working with closer to us, meaning that it is now a more loadable variation compared to the previous free weight variations. It is very similar to the Counter Balance Squat but further reinforces the idea that we want to move around the weight, and not move the weight around us. By implementing anteriorly loaded variations like these, and having the goal of moving straight up and down, we are learning to remain upright as the weight is pulling us forward, resulting in us no longer being able to push ourselves forward (for example: using too much toe and not enough heel when Squatting) because if we do - we fall over. And rule #1 of lifting weights...don't fall over.
Throughout this movement (and previous movements) we are learning multiple things. For example, how to maintain whole foot pressure, how to align and support our own rib cage and pelvis, how to posteriorly expand the rib cage, how to manage our own shoulder blades, all whilst moving straight up and down, as well as the role the abdominal muscles and lats play within trunk stability, and the Squat in general.
Similarly, we can also implement boxes and heel elevation with this variation too, depending on the individuals level of confidence and ability. Boxes and heel elevation can be great tools. However, they are not for everybody. It depends on the outcome we're trying to achieve, and then using the necessary tools to achieve those outcomes. Not just using heel elevation because we saw it on instagram.
COACHING CUES:
-
Hold the weight close
-
Long Spine & Abs Tight
-
Maintain Whole Foot Pressure
-
Go down into your Squat
-
Push straight up (not forward)

LEVEL FIVE (optional)
BB ZOMBIE SQUAT
(TO BOX < NO BOX & with possible heel elevation)
Continuing on from what we talked about previous in regards to moving around the weight, and not moving the weight around us - A common problem people have when they're learning how to front squat is allowing their chest and arms to fall, or gripping onto the barbell so hard because they want to move the barbell around them without it falling off.
Therefore, personally, I love incorporating the BB Zombie Squat as a way to learn how to maintain structural integrity whilst moving through space. In essence...sink or swim. Get it right, or don't.
The aim here is to develop the infrastructure necessary for the bar to sit on, without being reliant on us holding onto the barbell for it not to fall off. Similar to previous anteriorly loaded variations, our aim is to remain upright with the rib cage and pelvis aligned, whole foot pressure, and maintain the right hip to knee ratio.
Within the context of Zombie Squats...
Too much knee = no depth. Too much hip = bye bye barbell.
Boxes and heel elevation can also be included as a stepping stone between variations.
COACHING CUES:
-
Reach forward to separate shoulder blades
-
Position barbell on collar bones
-
Long Spine & Abs Tight
-
Maintain Whole Foot Pressure
-
Go down into your Squat
-
Keeping torso and arms up
-
Bar should remain over mid-foot
-
Push straight up (not forward)

LEVEL FIVE
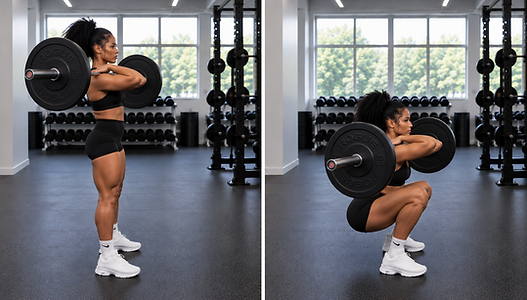
BARBELL FRONT SQUAT
(TO BOX < NO BOX & with possible heel elevation)
We are now introducing more loadable, and complex squat variations as ones execution improves. The Front Squat is one of my absolute favourites, but it is one we have to work up to. As someone's squat improves, we can increase the weight, but we can also make the environment more complex, further challenging their ability to complete the squat pattern. Seen as this too is an anteriorly loaded squat variation, we want to remain upright with our rib cage and pelvis aligned. Whole foot pressure. Posteriorly expand the rib cage and experiment with Lat engagement to complement abdominal tension. This variation also allows us to experiment with boxes, and heel elevation as well, similar to the squat variations we previously mentioned.
Execution wise, I often teach the Zombie Squat first. Then, once they have a solid foundation for the bar to sit on, then we fold the arms to support the bar. I tell my clients that this is exactly the same as a Zombie Squat, but we're gently putting the hands on the barbell for moral support - not to hold it up. As someone gets more and more confident with front squat, and the weight begins to get heavy, then yes - they will naturally hold on more. The aim is for us to learn how to squat first, hold second. Not hold to make up for an inability to squat.
But the good news is, it's one of the easiest lifts to bail out of. I get each one of my clients to practice bailing out of a Front Squat first, so that they know what to do if the situations arises.
COACHING CUES:
-
Reach forward to separate shoulder blades
-
Position barbell on collar bones
-
One hand on opposite shoulder (for moral support)
-
Long Spine & Abs Tight
-
Maintain Whole Foot Pressure
-
Go down into your Squat
-
Keeping torso and arms up
-
Bar should remain over mid-foot
-
Push straight up (not forward)
LEVEL SIX
HATFIELD SQUAT
(TO BOX < NO BOX & with possible heel elevation)
The Hatfield Squat is probably my favourite posteriorly loaded squat variation. I use this as a biomechanical tool more than anything as we get to experience what it's like to have weight on our back, but also experiment with rib cage position. Some times people hinge too much when they squat. Therefore, we can position their arms on the Squat Rack so that as they descend, they perform a "high reach" which can assist in elevating the rib cage and elevating "too much hip".
However, it is important to remember that the aim is push ourselves out of the squat with our legs, and not pull ourselves up out of the squat with our arms. Think as the arms as guard rails. They're not bowling the ball, but they can help it go in the direction it's trying to go.
COACHING CUES:
-
Position the bar on your back - not your neck
-
Reach arms forward, in a descending diagonal position (low reach)
-
Long Spine & Abs Tight
-
Maintain Whole Foot Pressure
-
Go down into your Squat
-
Bar should remain close to mid-foot
-
Push straight up with your legs (not pull with the arms)

LEVEL SEVEN (optional)
SSB Squat
(TO BOX < NO BOX & with possible heel elevation)
I have included the SSB Squat for several reasons. One being that shoulder function does come into play as we begin talking about posteriorly loaded squat variations like the barbell back squat, and not everybody will have the ability to hold onto a barbell once it's on their back. If someone does lack the shoulder movement required for a BB Back Squat, they may extend / flare their rib cage in order to hold onto the barbell. This would put the pelvis into a relatively anteriorly tilted position, which can then have a negative impact on their ability to squat. In other words, their shoulders are too tight to hold onto the barbell whilst it's on their back, so they lift their chest up and stick their bum out in order to hold onto the barbell. This would mean they no longer have a stacked rib cage and pelvis, and the quality and depth of the squat may become compromised.
Secondly, due to the position of the handles on the SSB we now have an additional opportunity to separate our shoulder blades (taking a page out of the anterior loaded squat variations book) This scapula protraction (separation) can assist in our ability to posteriorly expand the rib cage, and develop a greater understanding of the role our upper back, lats and abs play within a Squat pattern.
The SSB is one of my favourites, and a great tool to have in the tools box. If someone is struggling the organise their rib cage and pelvis during a barbell back squat - stick them on an SSB. It is a great variation for accessory work, but also for developing squat technique. Unfortunately, not everybody will have access to one. Similar to the other variations, we can also include boxes to gain better levels of positional awareness during different phases of the Squat, and we can also use heel elevation too (if necessary) to allow someone to potentially access to greater levels of depth.
COACHING CUES:
-
Position bar on your back - not your neck
-
Elbows in-front slightly
-
Long Spine & Abs Tight
-
Shoulder blades front pockets
-
Maintain Whole Foot Pressure
-
Go down into your Squat
-
Bar should remain close to mid-foot
-
Push straight up (not forward)

LEVEL SEVEN
BARBELL BACK SQUAT
(TO BOX < NO BOX & with possible heel elevation)
The Barbell Back Squat is the commonly known as the king of Squat variations and is the final one on our list. With that being said, there is no concrete absolute rule that everybody HAS to do a back squat (unless you're a powerlifter). More often than not, we simply want the benefits that a Squat pattern provides. So whatever Squat variation allows you to reap those benefits, go from there. And then you can explore other options down the line.
The back squat, along with the SSB Squat, are both variations where the weight is now positioned behind us, as apposed to the previously mentioned variations where the weight is in-front of us. Due to the nature of the weights positioning, it will force us to lean more forward. If the barbell is on our back, and we lean back, we fall. So we unconsciously adjust where we are in space (slight lean forward) so that we don't fall over. (Side note: The tools someone uses to "lean forward" may vary) This is why it isn't number 1 on our list. If someone is already leaning forward, why put them straight onto an exercise that pushes them further forward. First learn how to shift our weight back, so that we afford to go forward.
During the back squat we are showcasing everything we have learnt from the previous variations. If someone struggles with a back squat, see it as an opportunity. What are they missing? Regress. Address. Progress.
Depending on whether or not we're executing a low bar back squat, or a high back back squat, this will influence how much hip to knee ratio we use, a long with individual mechanics, such as femur length in relation to torso and tibia length. As well as current flexibility, mobility, and stability levels.
COACHING CUES:
-
Position bar on your back - not your neck
-
Elbows under the bar
-
Long Spine & Abs Tight
-
Shoulder blades front pockets
-
Maintain Whole Foot Pressure
-
Go down into your Squat
-
Bar should remain over mid-foot
-
Push straight up (not forward)

ADDITIONAL TOOLS
COMPLIMENTARY EXERCISES
Throughout this article I have highlighted a handful of tools you could use to help someone (or yourself) perform a Squat, or better access positions we may not naturally be able to access.
Again, these are tools. Which means that you do not HAVE to use them. But they're there if the situation requires them.
TOOLS YOU COULD CONSIDER USING...
-
HEEL ELEVATION
-
BOX (TO SIT ON)
-
BOX (TO TOUCH)
-
BALL / YOGA BLOCK (FOR ADDUCTION & IR)
When we're learning something new (like learning how to Squat) we can only focus / squat for so long. Therefore, I also like to include additional variations to maintain Squat pattern exposer, whilst simultaneously maintaining attention.
For example, single leg exercises (unilateral lower body movements) are a great way to compliment and further improve bilateral function (our ability to move on both legs)
During single leg exercises we are essentially zooming in and exaggerating the components of bilateral exercises, allowing us to focus on key elements.
There are countless variations we could include depending on the individual, and the outcomes we're trying to improve.
However, below I have listed a few of my favourites.
○ STATIONARY LUNGE
○ WALKING LUNGES
○ FRONT FOOT ELEVATED
BULGARIAN SPLIT SQUAT (FFE BSS)
○ REAR FOOT ELEVATED
BULGARIAN SPLIT SQUAT (RFE BSS)
○ LEG PRESS / SL LEG PRESS
○ IR STEP DOWNS

ANY QUESTIONS?
This article is simply scratching the tip of the iceberg. There are a load of components we need to consider, and they can also vary from person to person. If you need help with understanding this article, or implementing it within the gym, feel free to get in-touch!